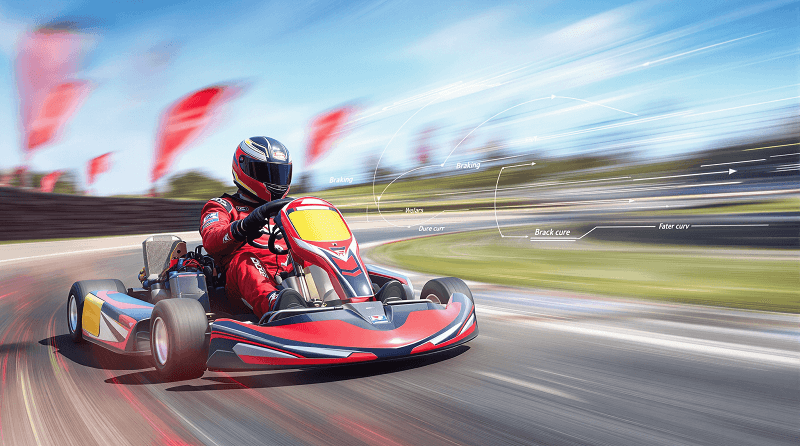
Ever watched a kart racer dive into a corner, brakes squealing, and somehow come out even faster? That’s trail braking in action—and it’s one of the most powerful techniques you can add to your karting toolkit.
I’ll never forget my first attempt at trail braking. I thought I was nailing it, but instead, I ended up spinning out and nearly mowing down a row of cones. Embarrassing? Sure. But it was also the moment I realized just how much there is to learn about controlling a kart at the limit.
Trail braking isn’t just for the pros. Whether you’re a casual driver or chasing the podium, mastering this technique can shave seconds off your lap times and give you a whole new level of confidence in the seat.
In this guide, I’ll break down exactly what trail braking is, why it works, and how you can start using it to leave your rivals in the dust. We’ll dig into the science, the step-by-step process, and even the mistakes I made so you don’t have to.
What Is Trail Braking?
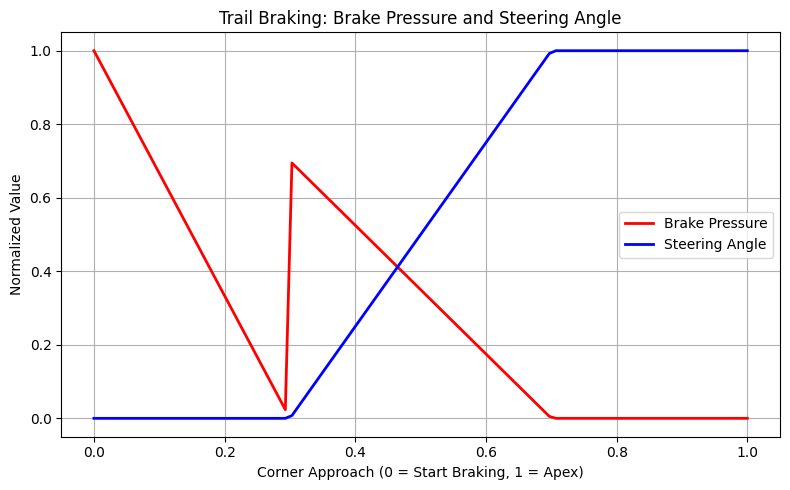
Trail braking is a driving technique where you continue to apply the brakes as you begin to turn into a corner, gradually releasing pressure as you approach the apex. Unlike traditional braking—where you finish all your braking in a straight line—trail braking lets you use the front tires’ grip for both slowing down and turning. This helps shift weight to the front, increasing front-end grip and allowing for sharper, more controlled corner entry.
In go karting, trail braking is especially effective because karts are lightweight and highly responsive to weight transfer. When done right, it lets you carry more speed into the corner and set up for a faster exit. If you want to dig deeper into the basics of kart braking, check out this in-depth guide on go kart braking.
The Science Behind Trail Braking
So, why does trail braking work so well? It all comes down to physics—specifically, weight transfer and tire grip. When you brake, the kart’s weight shifts forward, loading up the front tires and giving them more grip. By keeping some brake pressure as you turn in, you keep that extra grip on the front, which helps the kart rotate into the corner.

But there’s a balance. Too much brake and you’ll lock up or lose front-end grip, causing understeer. Too little, and you won’t get the benefit of extra rotation. The sweet spot is where you’re slowing down just enough while still letting the kart turn sharply. For a broader look at how to handle corners like a pro, check out this go kart cornering technique guide.
Why Trail Braking Matters in Go Karting
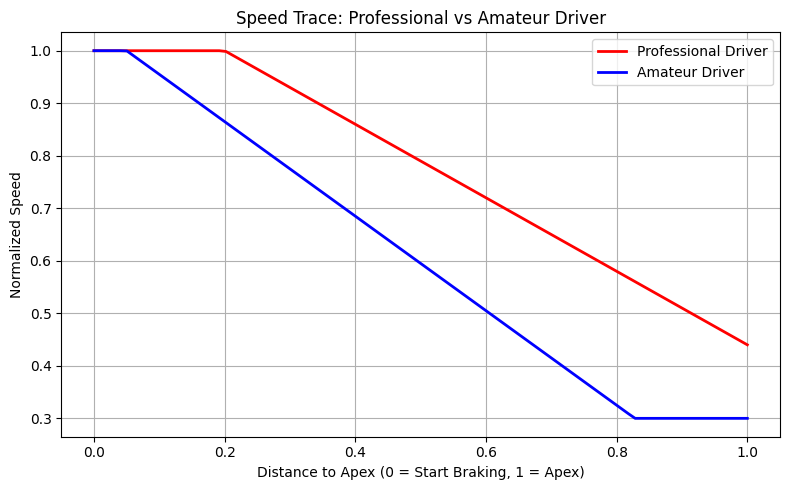
Trail braking isn’t just a fancy trick for advanced drivers—it’s a game-changer for anyone looking to improve lap times. By blending braking and turning, you can carry more speed into the corner and set yourself up for a faster exit. Even a small improvement in trail braking technique can make a huge difference, especially on tight tracks where every fraction of a second counts.
It’s also a safer way to approach corners, as it gives you more control if you need to adjust your line or speed mid-turn. Plus, mastering trail braking helps you adapt to different track conditions, like when the surface is slick or changing. If you’re racing in the rain, don’t miss these tips for go karting in wet weather to stay safe and fast.
When to Use Trail Braking
Trail braking isn’t a one-size-fits-all move. It shines in certain corners and conditions, but isn’t always the best choice. I’ve found it’s most effective in tight corners, hairpins, and any turn where you need the kart to rotate quickly. On fast, sweeping bends, you’ll usually want to finish your braking before turning in, since too much brake can upset the kart’s balance.
Track conditions matter too. On a dry, grippy track, you can be more aggressive with trail braking. But if the surface is wet or dusty, you’ll need a lighter touch—too much brake and you’ll slide right off the racing line. I learned that the hard way during a rainy club race, when I tried to trail brake like it was bone dry. Spoiler: I ended up facing the wrong way! Always adjust your technique to match the grip level and corner type.
How to Trail Brake in a Go Kart: Step-by-Step
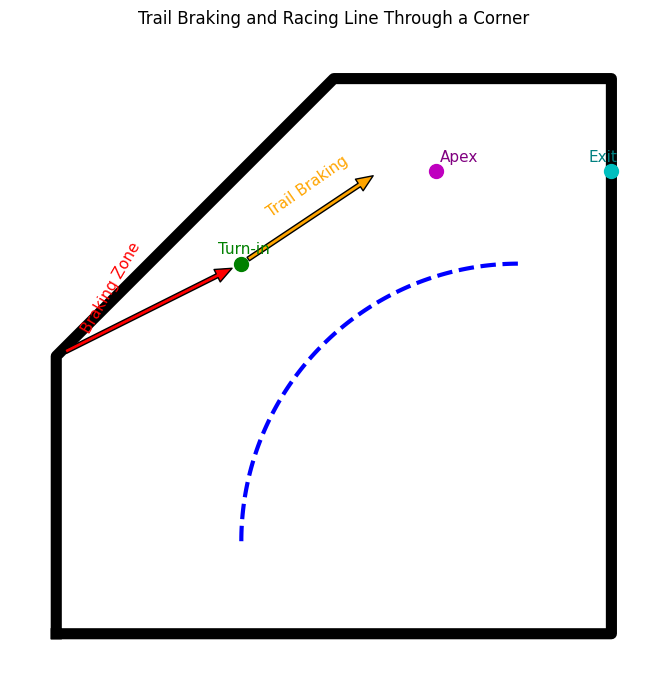
- Identify your braking zone: Start braking in a straight line before the corner, just like you normally would.
- Begin turn-in: As you approach the turn-in point, start to gently turn the steering wheel while maintaining brake pressure.
- Hit the apex: With the kart rotated and pointed toward the exit, smoothly transition from brake to throttle.
- Modulate brake pressure: Gradually release the brake as you increase steering input. The goal is to be off the brakes by the time you reach the apex.
- Accelerate out: Once you’re past the apex and the kart is stable, get back on the gas and power out of the corner.
It took me a few sessions to get the timing right. At first, I’d either let off the brakes too soon and understeer, or hold them too long and spin out. My advice? Start slow, focus on being smooth, and don’t be afraid to experiment with different amounts of brake pressure and steering. Every kart and track is a little different, so keep tweaking your approach until it feels right.
Common Mistakes and How to Fix Them
Let’s be real—trail braking isn’t easy to master, and I’ve made just about every mistake in the book. One of the biggest errors is over-braking into the corner. If you keep too much pressure on the brake pedal, you’ll overload the front tires and the kart will understeer, pushing wide and missing the apex. On the flip side, if you release the brakes too early, you lose the benefit of weight transfer and the kart won’t rotate as much as you want.
Another classic mistake is not matching your trail braking to the type of corner or the track conditions. For example, in a tight hairpin, you might need to trail brake deeper to get the kart to rotate. But in a fast sweeper, too much brake can make the rear end snap around. I’ve also seen drivers panic and jump off the brakes mid-corner, which almost always leads to a loss of control. The fix? Practice being smooth and consistent, and always look ahead so you can plan your braking and turn-in points.
Don’t forget, kart setup can play a role too. If your brakes are too grabby or your tires are worn, trail braking will be a lot trickier. Make sure your kart is in good shape before pushing the limits.
Practice Drills for Mastering Trail Braking
The only way to really get good at trail braking is to practice—over and over. I like to set up cones or use track markers to define my braking zones and turn-in points. Start by braking a little later than usual, then gradually ease off the brake as you turn in. Focus on being smooth, not fast. It’s tempting to push hard right away, but building muscle memory is way more important than chasing lap times at first.
One drill I swear by is the “apex focus” drill. Pick a corner and try to hit the same apex lap after lap, adjusting your brake release each time. If you miss the apex, note whether you released the brake too early or too late, and tweak your approach. Another great exercise is to practice trail braking in different corners—tight hairpins, medium-speed bends, and even chicanes. Each one teaches you something new about how your kart responds.
Don’t forget to review your progress. If you have access to a lap timer or data logger, check your entry and exit speeds. Sometimes the smallest change in brake pressure or timing can make a big difference. And if you’re struggling, ask a more experienced driver to watch you or even ride along for a session. Their feedback can be a game-changer.
Advanced Tips: Adapting Trail Braking for Wet Weather, Race Starts, and More
Once you’ve got the basics down, it’s time to level up. Trail braking isn’t just for dry, perfect conditions. In fact, it can be a lifesaver in the wet—if you do it right. The key is to be extra gentle with both the brakes and the steering. In the rain, the track is slick and the margin for error is tiny. I learned the hard way that even a little too much brake can send you spinning.
Trail braking can also help during race starts and when overtaking. If you’re side-by-side with another driver, a well-timed trail brake can help you out-brake your opponent and claim the inside line. Just remember, it’s all about control—don’t get greedy with the brakes or you’ll end up losing more than you gain. And always adjust your technique for different karts, tire compounds, and track surfaces. The best drivers are the ones who can adapt on the fly.
Finally, don’t underestimate the mental side of trail braking. Confidence and focus are huge. If you’re second-guessing yourself, you’ll hesitate and lose the edge. Trust your instincts, stay relaxed, and keep practicing. Every session is a chance to get better.
Safety Considerations & Equipment
Trail braking is a high-skill technique, and like anything that pushes the limits, safety should always come first. Before you start experimenting with late braking and deeper corner entries, make sure your kart is in top shape. Check your brake pads, fluid, and tires—worn-out parts can make trail braking unpredictable and even dangerous.
Don’t skimp on safety gear, either. A quality helmet, gloves, and a proper racing suit are must-haves, even for practice sessions. If you’re karting with kids or new drivers, double-check that everyone’s gear fits well and meets current safety standards. For more on what to wear and how to stay protected, check out the kart safety essentials on GoKartLife.
Finally, always respect the track rules and your fellow drivers. Trail braking can catch people off guard, especially if they’re not expecting you to brake later or deeper into a corner. Communicate, be predictable, and never try new techniques in crowded or unsafe conditions. Safety isn’t just about you—it’s about everyone on the track.
Frequently Asked Questions (FAQ)
Is trail braking only for advanced drivers?
Nope! While it’s definitely an advanced technique, beginners can start learning the basics of trail braking with slow, controlled practice. Just remember to focus on smoothness and safety before trying to push your limits.
Can trail braking damage my go kart?
If done correctly, trail braking won’t harm your kart. But if you’re constantly locking up the brakes or sliding, you could wear out your tires and brake components faster. Always keep your kart well-maintained and check for wear after practice sessions.
Should I use trail braking in every corner?
Not always. Trail braking works best in tight or technical corners where you need extra rotation. In fast, sweeping turns, it’s usually better to finish braking before you turn in. Adapt your technique to the track and conditions for the best results.
How do I know if I’m trail braking correctly?
You’ll know you’re getting it right when the kart feels stable and rotates smoothly into the corner, without understeer or snap oversteer. If you’re missing apexes or spinning out, adjust your brake release and steering input. Reviewing onboard footage or data can help spot mistakes.
What’s the difference between trail braking and regular braking?
Regular braking is done in a straight line before the corner, while trail braking continues as you turn in, gradually releasing the brake as you approach the apex. Trail braking helps transfer more weight to the front tires, giving you extra grip and sharper turn-in.
Conclusion & Next Steps
Trail braking is one of those skills that separates good drivers from great ones. It’s not easy, and you’ll probably make a few mistakes along the way—I sure did! But with patience, practice, and a focus on safety, you’ll start to feel the kart rotate and grip in ways you never thought possible. Remember, every track and kart is a little different, so keep experimenting and learning each time you hit the circuit.
If you’re serious about improving your lap times and confidence, make trail braking part of your regular practice routine. Review your data, ask for feedback, and don’t be afraid to try new things.

Last modified: April 17, 2025